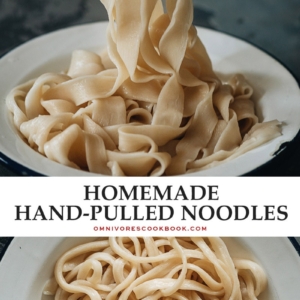
These freshly made hand-pulled noodles are springy and meaty, with a chewy mouthfeel that you’ll never get from dried noodles. Learn all the secrets of hand-pulled noodles so you can easily make them at home without fail! {Vegan}
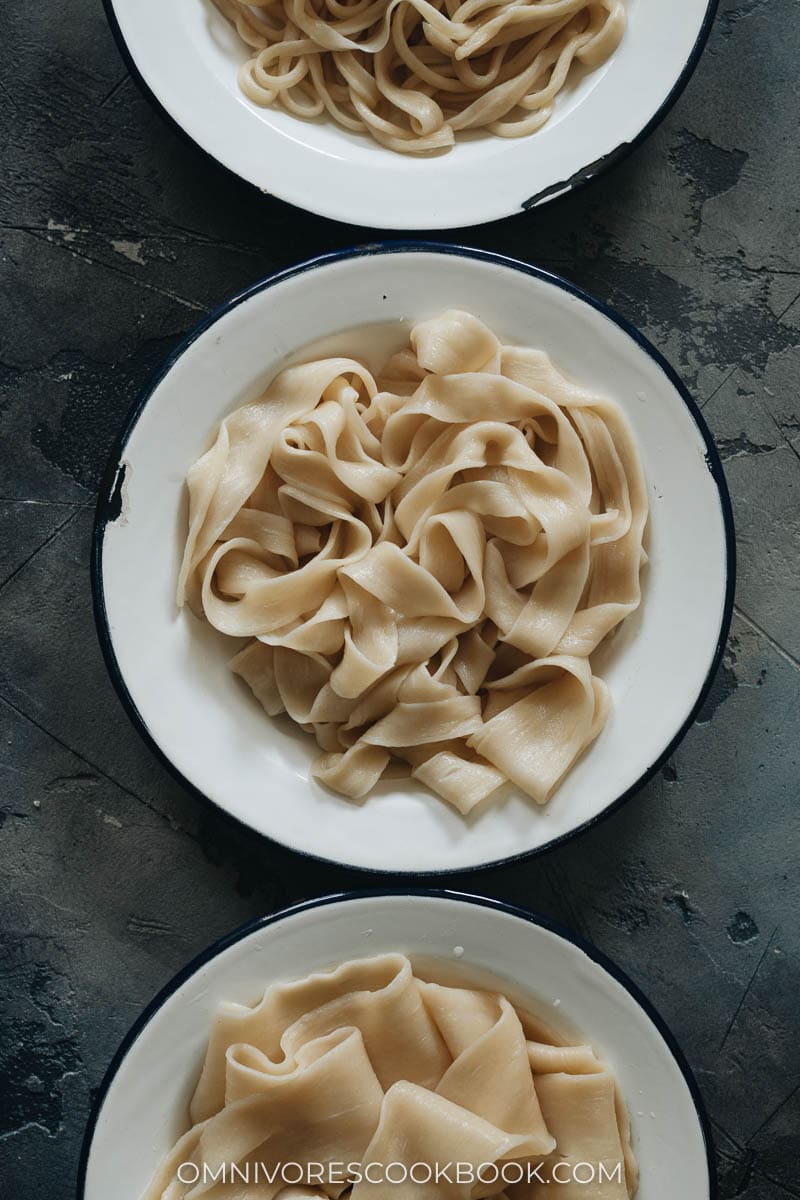
Noodles are one of the most important elements of Chinese food culture. Handmade noodles might be a rarity, and even a pricey proposition outside of China. However, back in the old country, they are a cheap everyday comfort food. No matter whether it’s a hot bowl of noodles in a restaurant or freshly made noodles to cook at home, it is one of the cheapest ways to get a fast, fulfilling, and hearty one-dish meal.
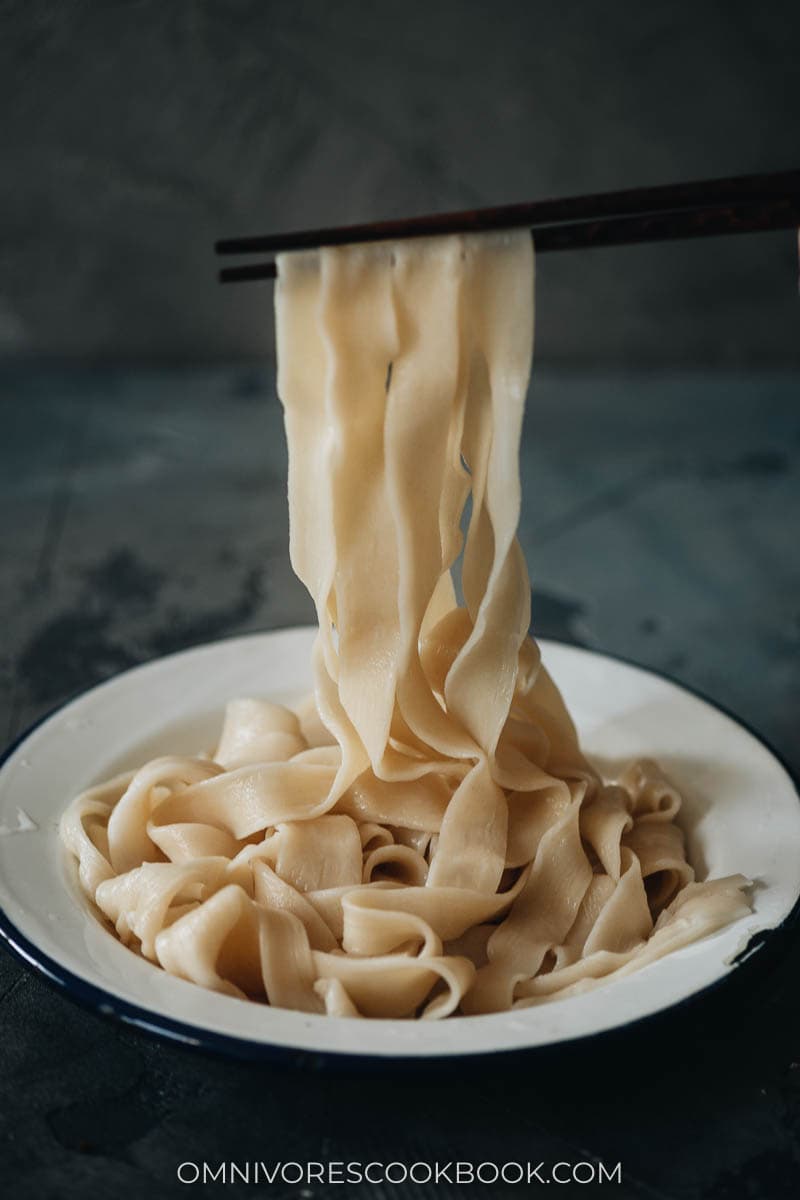
Why make noodles at home
Despite the low cost of noodles at restaurants, a lot of people still enjoy making them from scratch at home. The reason? Because:
- It’s just so easy to make hand-pulled noodles once you’ve learned the trick.
- Homemade noodles don’t contain any additives. Packaged fresh noodles usually have additives for a better mouthfeel and a longer shelf life.
- The freshly made noodles taste so good, much better than the packaged dried ones.
There are countless types of noodles in China and I will introduce you to the hand-pulled (拉面, la mian) variety. It might sound daunting to make this type of noodle at home, especially if you’ve ever watched a noodle dance in China. But the truth is, hand-pulled noodles are one of the easiest handmade noodles for a beginner to make.
Why hand-pulled noodles are the easiest homemade noodles and the one you should learn first
This leads me back to one of my fun cooking experiences several years ago. Back in 2011, I was still quite bad at cooking and didn’t cook as much as I do now. One day, my boyfriend (and now husband) and I decided to try to make hand shaved noodles (刀削面, dao xiao mian).
It’s a specialty from Shanxi province. To cook it, you need to make a block of very tough dough and use one hand to hold the dough and the other to use a special square-bladed knife to carve off thin pieces of dough directly into boiling water. Sometimes for the sake of performance, a chef will put the dough on his head and use both hands to slice noodles into the pot. It’s quite a scene, in a circus act kind of way.
Long story short, we didn’t manage to get the dough right and it was too soft to slice. Since we didn’t want to waste it and the noodle sauce was ready, we started to pull the dough by hand and made our first bowl of hand-pulled noodles at home.
You see what I did there? Even when you fail at making other types of noodles, you can still use the dough to make hand-pulled noodles, because they’re such a no-brainer!
Our approach
There are two different approaches to making hand-pulled noodles. In most professional kitchens, the most common way is to knead the dough for a very long time to develop the gluten, then let it rest for even longer so the dough is relaxed enough to pull.
However, we found that method not practical in the home kitchen since no one wants to knead the dough for an hour (it takes a similar amount of time, even with a KitchenAid mixer).
After many test runs, we found that the key to making hand-pulled noodle dough is to knead just enough to get the dough smooth without developing too much gluten. So you do not need to rest the dough for too long before pulling. Our method requires very little active kneading, and it will yield a soft and springy dough that’s very easy to work with.
How to make hand-pulled noodles
(1) Prepare the dough – 1 short rest
To make the dough without developing too much gluten, you will need to rest the dough three times before pulling the noodles.
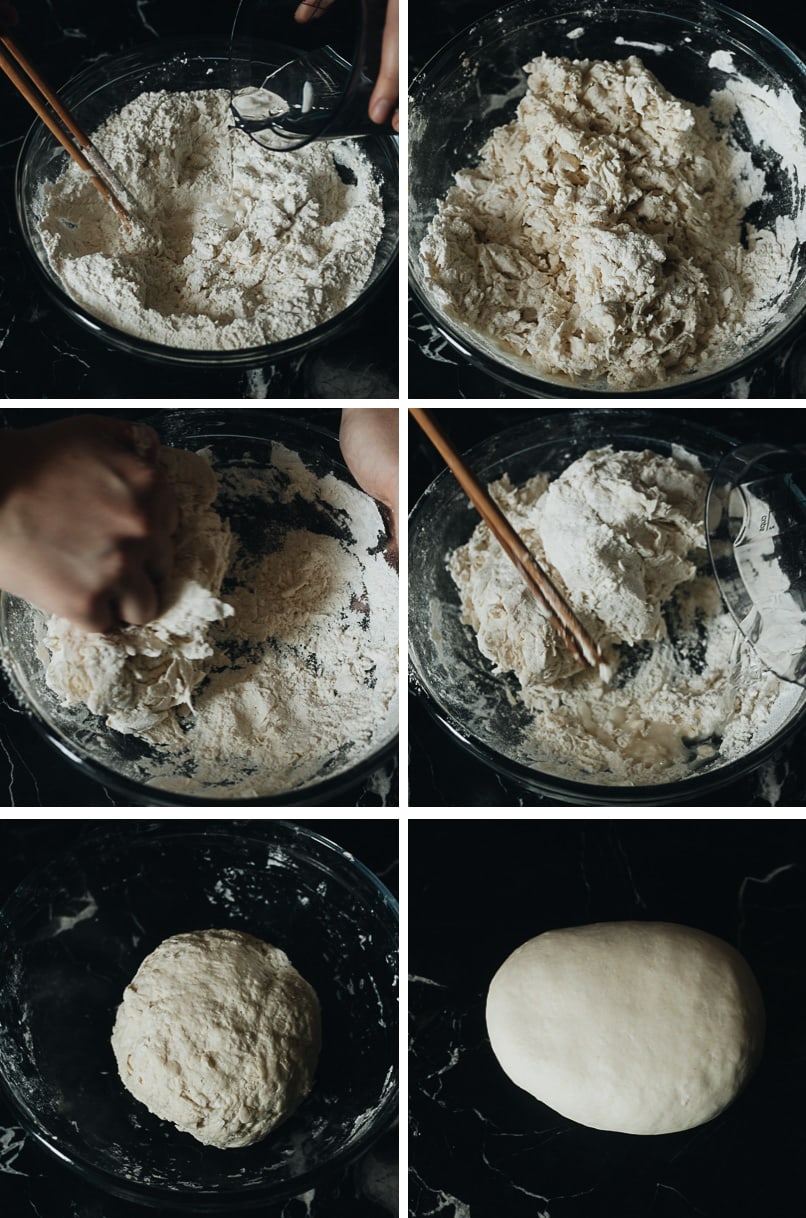
- Slowly drizzle the salt water into the flour and mix at the same time.
- Mix until the water is fully incorporated and the flour turns into shaggy threads.
- Start to knead the dough together.
- If there’s still some dry flour left, drizzle in a bit more water until there’s no dry flour left.
- Once you mix the flour and water, only knead the dough for 2 minutes until it forms a very rough ball. Do not overwork the dough.
- Let the dough rest for 20 minutes before kneading it again, for just 1 to 2 minutes, until the dough becomes smooth.
(2) Shape the dough – 2nd resting
Roll out the dough depending on the type of noodles you want to make and let it rest for 2 hours to fully relax the gluten before pulling and cooking.
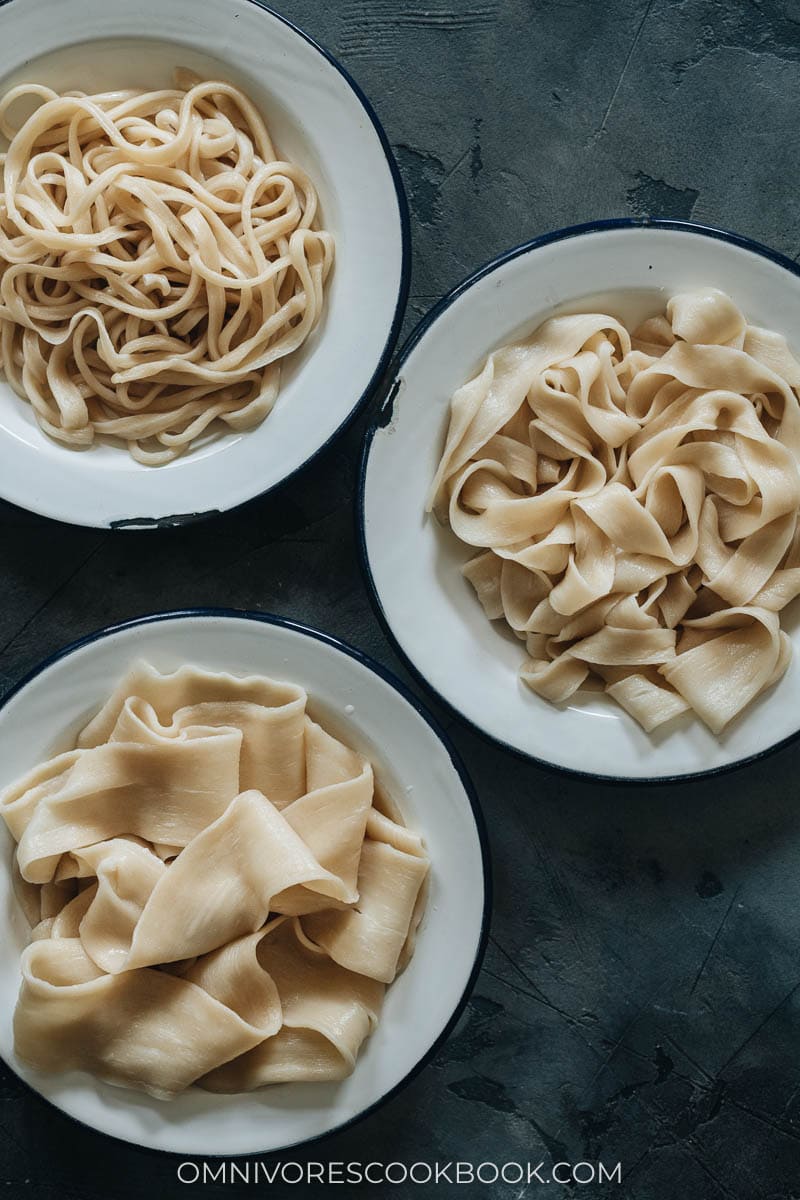
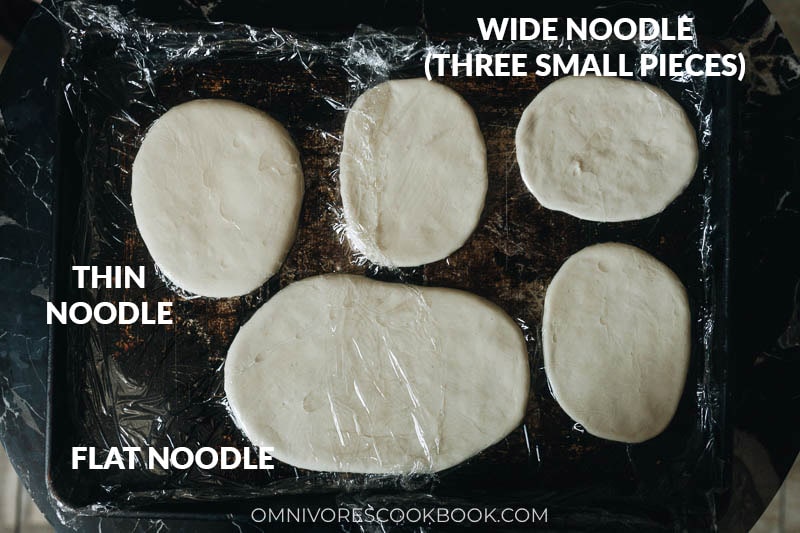
We’ve included three types of noodle doughs in this recipe, so you can choose the type you prefer:
- Thin noodles: great for noodle soup, fried noodles, or lo mein noodles
- Flat noodles: good for noodle soup or noodles served with a sauce
- Wide noodles: good with a super heavy sauce such as cumin lamb or da pan ji
NOTE: it’s important to oil the dough and cover it, to prevent them from sticking and drying out.
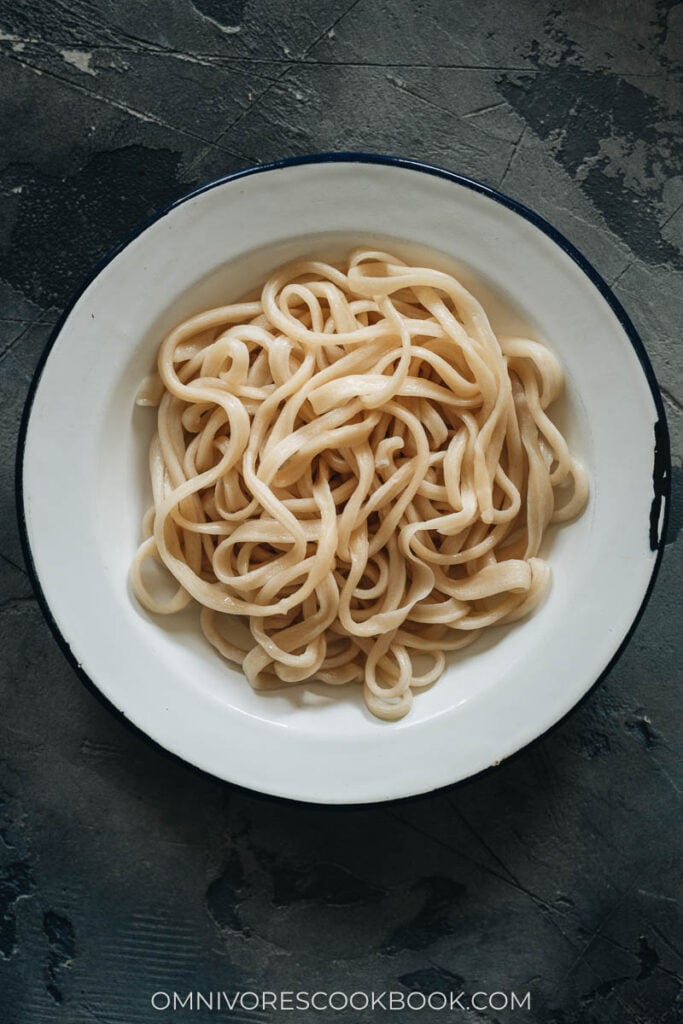
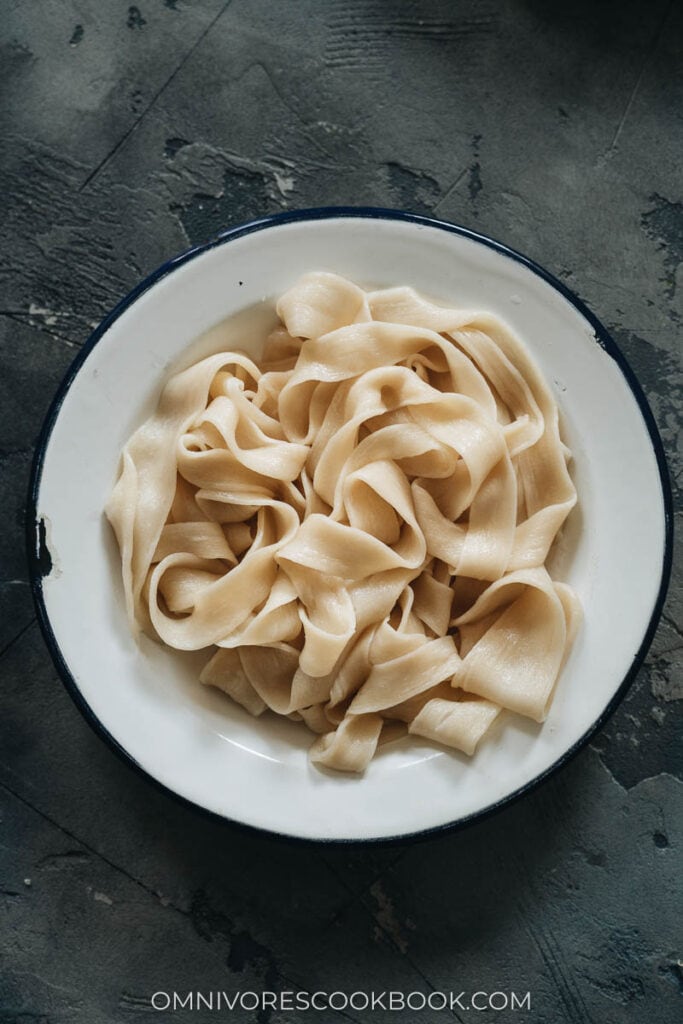
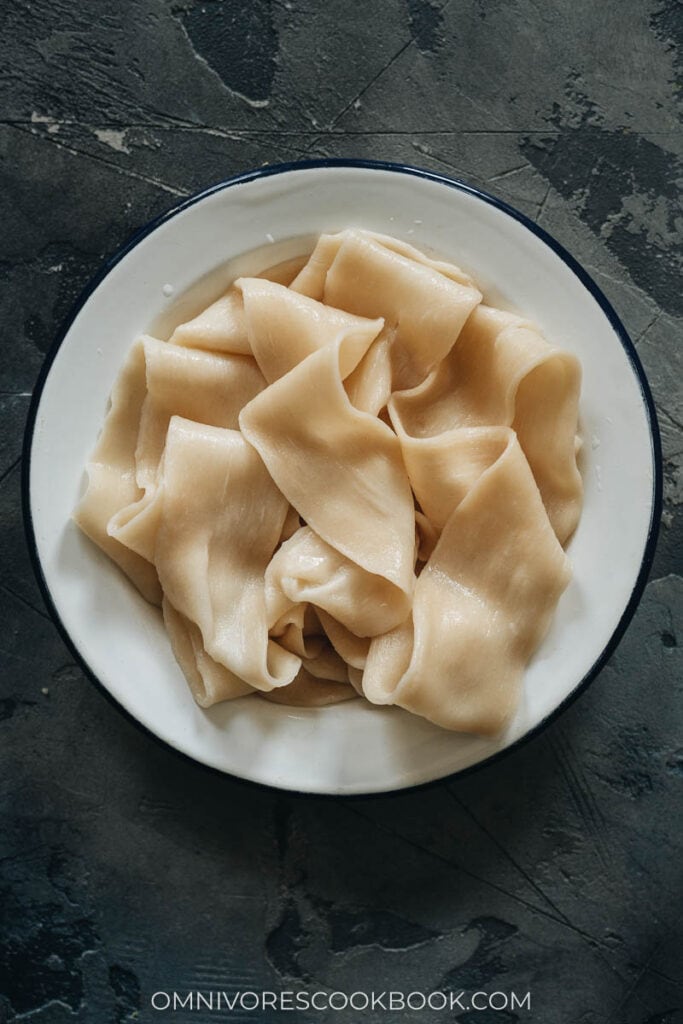
(3) Pull the noodles
- First, you need to cut the dough according to the width of the noodles you want to make.
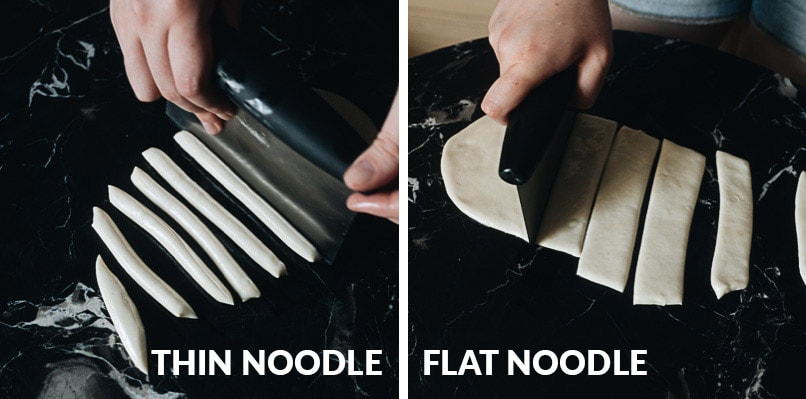
PS: It’s important to keep the cut noodles covered with plastic wrap so they don’t dry out.
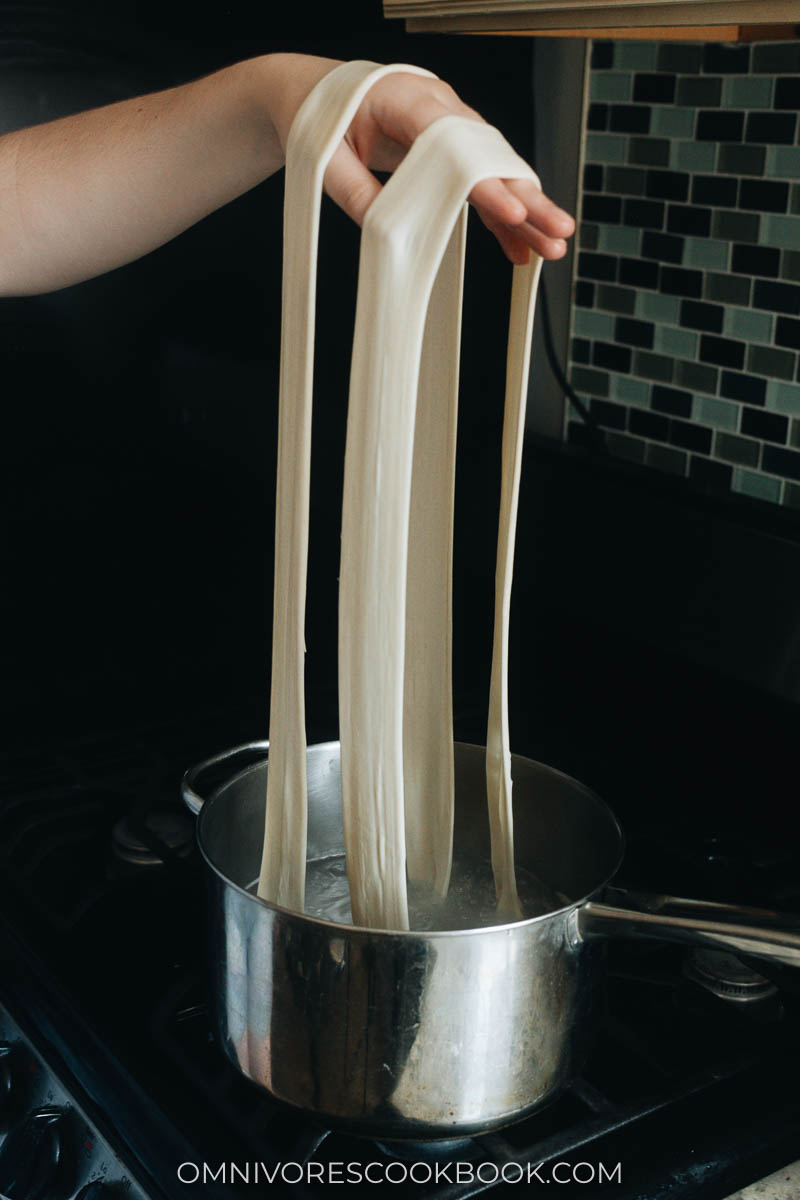
- The process of pulling the three types of noodles is the almost same – pull the dough into a thin strip with one motion, and keep pulling and bouncing on the table into a thin shape, then fold it, pull it, and bounce it again until it reaches the desired thickness (except for flat or wide noodles, which you don’t need to fold).
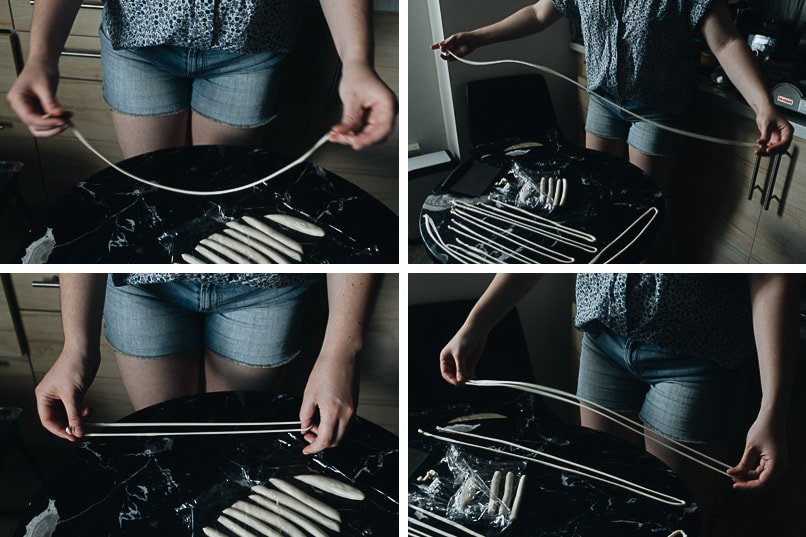
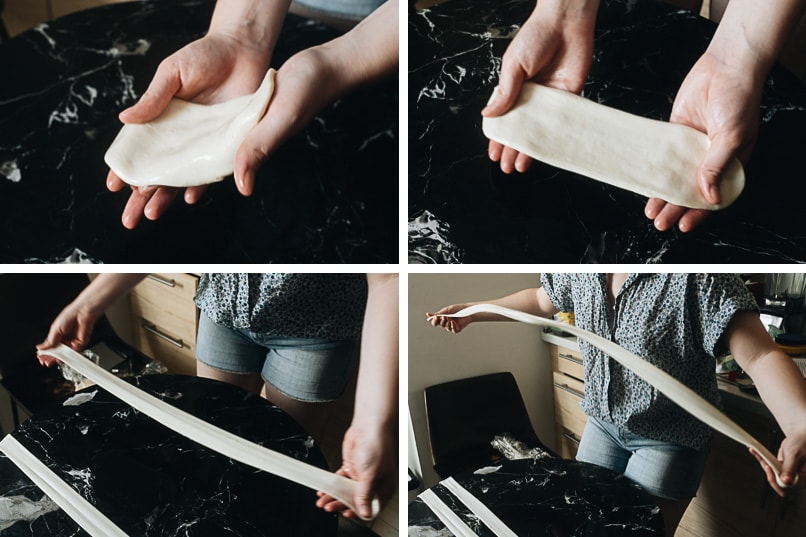
- Once you’ve pulled the noodles, rest them on the working surface without overlapping. If you have a small working surface, you can dust the noodles with flour so they don’t stick together if placed too closely together.
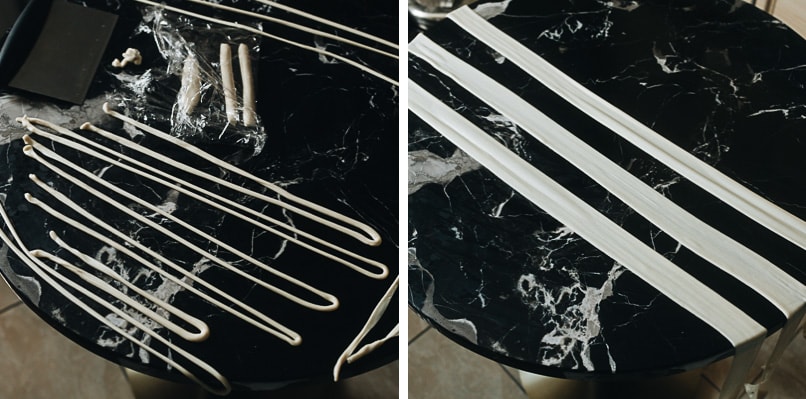
(4) Cook the noodles
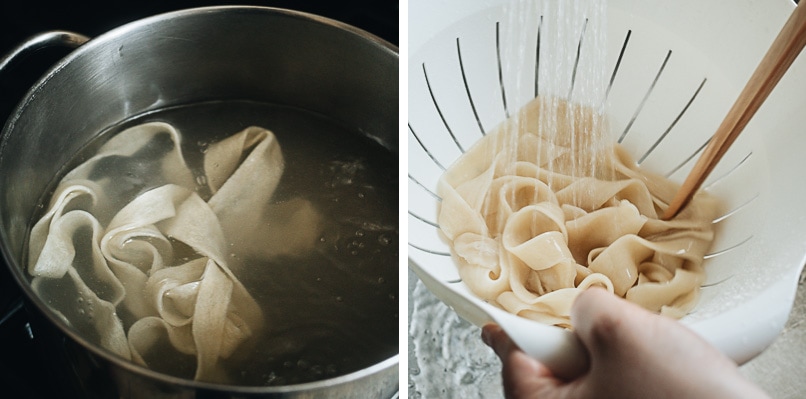
- To cook the noodles, drop a few strands of noodle into the boiling water at a time and cook until they’re cooked through and springy. If you prefer the texture to be softer, boil them a bit longer.
- Once done, remove the noodles to a colander and rinse them with tap water to stop the cooking.
(5) Serve and store
The freshly made noodles can be enjoyed with a simple sauce and made into various noodle dishes including soup and stir fries.
Here are some ideas on how to use them:
- Cumin Lamb Noodles
- Vegetable Lo Mein
- Easy Soy Sauce Noodles
- Real Deal Sesame Noodles
- Dan Dan Noodles
- Da Pan Ji (Chicken Potato Stew with Noodles)
- Lanzhou Beef Noodles
- Biang Biang Noodles (Chinese Hot Sauce Noodles)
You can find detailed information in the recipe below on storage.
Frequently asked questions
Can I store the raw hand-pulled noodles?
Unfortunately, NO. It’s very important to cook the noodles immediately once you’ve pulled them. In fact, the pulled noodles should be dropped directly into boiling water (that’s how they do it at restaurants). If you want to store the raw noodles, you must use starch (or flour) to coat them so they won’t stick together. But the dough will change in texture during this process.
If you want to store raw noodles, check out my rolled noodles recipe.
Can I store the cooked noodles?
YES! This is the best way to store them. You can slightly undercook the noodles if you plan on storing them. So they reach the perfect consistency once they’re reheated. You can see more notes on how to reheat in the recipe below.
Can I store the noodle dough?
Yes. Once you roll out the dough and let it rest at room temperature for 2 hours, you can cover the dough and move it to the fridge. Cut, pull, and boil the noodles when you plan to serve them.
Do the noodles work in stir fries?
Yes! The thin type of noodles works perfectly in stir fries and as lo mein noodles.
In this case, I recommend you slightly undercook the noodles, so they will achieve the perfect textures once stir fried.
What brand and kind of flour did you use?
We tested with various brands and types of flour and finally achieved a consistent result no matter what brand we were using.
In the pictures I used all-purpose flour from the King Author brand (11.7% protein content).
We also tried a mixture of 370 g (3 cups) of cake flour and 30 g (3 tablespoons) of bread flour. This mixture produces a slightly smoother dough (marginally). It’s possible to use different blend to achieve different texture, even 100% bread flour, but I do not recommend using 100% cake flour.
Back in China I used a Chinese-brand all-purpose flour. It required slightly more water (a bit more than 1 cup).
I saw professional hand-pulled noodles use alkaline water. Why don’t you use it?
Using alkaline water in the noodle dough increases the chewiness of the texture and it doesn’t affect the pulling process. (It is the salt that makes the dough stretchy.) I found that even if you skip the alkaline water, you will produce a great result with a chewy texture (without the noodles getting too tough). So I decided to skip this ingredient, which makes the recipes a bit more complicated.
Is it possible to pull several noodles simultaneously?
Yes, but you might need a bit of practice. If you decide to pull more than one noodle at a time, coat the dough with flour before pulling so the noodle strands don’t stick together.
Can I rest the dough for longer?
Yes. It won’t affect the result much. Especially the 2nd resting. Once the dough is relaxed, it stays relaxed if you store it for hours before pulling.
Recipe update notes
I created this recipe back in 2015 while I was still living in China. It’s a family recipe and I created a short video to show the process.
Over the years I’ve received many readers’ positive feedback and questions. Moreover, I have since moved to the US and realized that all-purpose flour here is different from the ones in China (namely, they have more protein content). The old recipe still works but sometimes it does not produce consistent results depending on the brand of flour you use.
That’s why we decided to retest the recipe using various types of flour in the US, slightly refining the process to make the result more consistent and closer to perfect each time.
We also added instructions on making different shapes of noodles according to your suggestions.
You can still find the old recipe attached at the end of this post.
I haven’t managed to update the video yet, so you will find the old video using my previous recipe (the pulling is different). I will try to create a new video soon. Stay tuned!
Want to learn more about Chinese Cooking? Sign up my newsletter to receive the 5-Day Chinese Cooking Crash Course and recipe update!
Easy Hand-Pulled Noodles
Ingredients
- 400 g (2 2/3 cup) all-purpose flour (*Footnote 1)
- 2 g (1/2 teaspoon) salt
- 220 ml (1 cup minus 1 tablespoon) water , room temperature
- Vegetable oil to coat the dough
Instructions
Make the dough by hand (Option 1)
- Combine the water and salt in a small bowl. Stir to dissolve the salt.
- Add the flour into a large bowl. Bit by bit, pour the water into the flour, mixing with a pair of chopsticks or a spatula as you go.
- Once all the water is added, the dough should be in shaggy threads with little/no dry flour in the bowl. Begin pressing the dough together. If you find the dough is too dry and there’s still dry flour that’s hard to incorporate into the dough, drizzle more water onto the dry flour and mix it again, until there’s no dry flour left. Knead the dough until a rough, firm ball is formed, about 2 minutes.
- Cover the bowl with plastic wrap and let it rest for 20 minutes.
- Once the dough is rested, knead it again until it becomes smooth, 1 to 2 minutes.
Make the dough using KitchenAid (Option 2)
- Mix the flour and salt in the bowl of the KitchenAid mixer and add the dough hook. Turn it to the mix setting. Slowly drizzle the water down the side, all along the bowl. This should take about 1 minute. Once the water is incorporated, turn to setting 2 and knead until a rough dough ball is formed, another 2 to 3 minutes.
First rest
- Cover the dough with plastic wrap and let it rest for 20 minutes.
Second kneading
- Either knead in the machine on setting 4 for 30 seconds or by hand for 1 to 2 minutes. Then shape the dough.
- (Optional) If you plan to store/freeze the dough, coat the dough with oil and store it in a sealed plastic bag. Refrigerate for up to 2 days or freeze for up to 3 months.
Shape the dough
- FOR THIN NOODLES: Divide the dough to halves and roll each dough into a 1/2” (1 cm) thick oval.
- FOR FLAT NOODLES: Divide the dough to halves and roll each and roll each dough into a 1/4” (1/2 cm) thick oval.
- FOR WIDE NOODLES: Cut the dough into 8 pieces. Roll each piece into approximately 3”x5” (8×13 cm) ovals, 1/4” (1/2 cm) high.
Second rest
- Coat the dough(s) generously with oil and cover with plastic. Let rest for 2 hours.
Pull and cook the noodles
- Bring a medium-sized pot of water to a boil.
- FOR THIN NOODLES: Cut long the longer side of the oval, slicing the dough into 1/2” (1 cm) wide strips and rolling each piece slightly to the side with each cut to prevent them from sticking together. Cover the cut pieces with the plastic again to prevent them from drying out. Starting with the first strip you cut off, pick it up on both ends. (*Footnote 2) In one swift motion, tug the noodle about an arm’s length and gently bounce it on the working surface once or twice until it forms a long, thin noodle. Rest the noodle on your working surface as you fold it over, so that both ends are in one hand. Hook the other side with your thumb. Give it a couple light tugs and bounces until the noodles get longer and reach the desired thin shape. Then pull off the thick ends collected in one hand and lay the noodle out on the working surface. Repeat with the rest of your noodles.
- FOR FLAT NOODLES: Cut along the longer side of the oval, slicing the dough into 1 1/2” (3 cm) wide strips. Cover the cut pieces with the plastic again to prevent from drying out. Starting with the first strip you cut off, pick it up on both ends. (*Footnote 2) In one swift motion, tug the noodle to about an arm’s length and gently bounce it on the working surface once or twice. Rest the noodle on your working surface for 10-20 seconds, then give it a couple extra-light tugs and bounces until it forms a flat long noodle. Then pull off the thick ends and lay the noodle out. Repeat with the rest of your noodles. Drop the noodles into the boiling water, a few at a time, and cook for 1 to 1.5 minutes.
- FOR WIDE NOODLES: One at a time, grip the short ends of a strip (*Footnote 2) and pull it apart in one swift motion until the dough feels taut. It should be between 1 to 2 feet. Bounce it on the table a couple times. Pull off the thick ends and lay the noodle out, covering it with plastic to prevent drying out.
Cook the noodles
- Drop the noodles, a few pieces at a time, into the boiling water and cook for 1 to 1.5 minutes, until tender but still with a chewy texture. Do not cook too many noodles at a time! It’s hard to control the texture that way and the noodles might stick together.
Storage
- Store the cooked noodles: If you plan on reheating, you can slightly undercook the noodles (to al dente) to create a better texture once reheated. Store the noodles in an airtight container or a ziplock bag in the fridge for up to 3 days or in the freezer for up to 3 months.
- For frozen/refrigerated dough; let the frozen dough thaw in the fridge overnight. Transfer the refrigerated dough to room temperature. Rest for 2 hours. The dough will become super soft and can be gently shaped, rested for another 10 minutes or so, and pulled. Cook according to the instructions above.
Reheating cooked noodles
- To reheat, bring a pot of water to a boil and add the cooked noodles. Separate with a pair of chopsticks and cook until the noodles are just heated through.
- For a quicker and lazier reheating method (for leftovers), reheat the refrigerated noodles in the microwave until heated, then quickly rinse the noodles with tap water in a colander. Drain the water thoroughly before serving.
- If you plan to use the thin noodles for fried noodles, you don’t need to reheat them before using. Thaw them if frozen. Then run the noodles with tap water in a colander and separate gently with chopsticks. Drain thoroughly before using for stir fried noodles.
Notes
- If you do not have all-purpose flour, you can use 370 g (3 cups) cake flour + 30 g (3 tablespoons) bread flour instead.
- If you do not have a lot of space for the pulled noodles or if you’d like to try pulling a few noodles at a time (it takes practice but it’s possible!), you should dust the noodle dough with extra flour to prevent them from sticking together.
Nutrition
If you give this recipe a try, let us know! Leave a comment, rate it (once you’ve tried it), and take a picture and tag it @omnivorescookbook on Instagram! I’d love to see what you come up with.
Lilja Walter is a part of the Omnivore’s Cookbook team and worked closely with Maggie to develop and test this recipe.
The old recipe (before update)
Ingredients
- 420 grams (3 cups) all-purpose flour and extra to dust the working surface
- 1/2 teaspoon salt
- 1 cup and 3 tablespoons (285-ml) water (room temperature)
Instructions
To prepare the dough
- Combine flour and salt in a large bowl and mix well. Slowly blend in water and mix with a pair of chopsticks, until water is integrated with the flour and there is no dry flour left. Dust both hands with dry flour, then start to knead by hand until dough forms. The dough should be quite soft and sticky.
- Dust a working surface with dry flour. Transfer the dough onto it and continue to knead until the surface turns smooth and the texture springy, 10 to 15 minutes. Dust hands and the working surface with extra flour whenever the dough starts to feel sticky during the process.
- Dust a large bowl with dry flour. Transfer the dough to that bowl and cover the dough with a damp dish towel. Cover the bowl with a lid (or plastic wrap). Let the dough rest at room temperature for at least 2 hours (or store the dough in the fridge if you’re planning to use it the next day, after resting at room temperature).
- Dust the working surface and both hands with flour. Transfer the dough onto the working surface and knead it a few times. Divide the dough into 2 equal pieces, then again to make 4 pieces total. Knead each piece of dough by hand to shape a ball.
- Dust the working surface again. Take one piece of dough and press it into a round disc. Roll it with a rolling pin into a long and round sheet, about 5 to 6 millimeters (0.2 inches) thick. Roll out the rest of the dough pieces the same way. Use large bowls or plastic wrap to cover and seal the dough sheets, to keep them from drying out. Let rest for another 30 minutes to 1 hour.
To pull and cook the noodles
- Right before making noodles, bring a medium sized pot of water to a roaring boil (very important).
- Work on the dough sheets one by one. You should cover the rest of the dough with a damp dish towel or plastic wrap.
- Slice the dough sheet into several strips, about 2 centimeters (0.8 inches) wide (or narrower if you want thinner noodles).
- Pick up a strip of dough and start to pull it from one end to shape an evenly thick, long noodle, until it becomes quite thin and almost breaks apart. It’s OK if the noodle breaks into 2 to 3 shorter segments. Drop the noodles immediately into the boiling water. (To get the idea of the process, please refer to this short video.)
- Pull another 2 to 3 strips of dough and drop them into the boiling water. Cover the rest of the dough with a damp dish towel (see footnote). Boil the noodles until cooked through, 1 to 2 minutes. Transfer to a plate and set aside. Work on the rest of the dough in the same manner.
To serve and store
- You can use the noodles in any noodle soup or mix them with sauce. If you aren’t going to serve the noodles immediately, add a few drops of sesame oil onto them and mix by hand. You should always eat the noodles while they’re warm and fresh, because they will become sticky and turn into a solid mass once they cool off.
- Store leftover noodles in an airtight container in the fridge for 1 to 2 days.
- To serve leftover noodles, place them in a colander so that you can easily dip them into a pot of boiling water. When you do this, use a pair of chopsticks to gently separate the noodles, and leave them in the water until warm. Heating them this way shouldn’t take more than 30 seconds.
NOTES
The noodles are very easy to cook through, so I suggest you cook them in small batches, until you’re familiar with the process. You should always cover the unused dough with a damp dish towel or plastic wrap, because it will dry out very fast.





Hey Maggie. What brand and kind of flour did you use? My dough never quite seems as smooth as the images, and I wonder if it’s from my elevation? I’m at 3200 feet.
Hi Dano, I have used many brands including King Author, and the dough turned out well. If your dough is not smooth enough, it might be because you didn’t knead it long enough, or you didn’t rest it long enough. For noodle dough, if you let it rest and knead it a few times before shaping, they will eventually become smooth and tender. I’m not sure about the elevation though, since I’ve never cooked it in a place that high…
我唔可以做喎。I used Whitelily flour, left it in for 24 hours the first time, tried again at 48 hours, same result. When I pulled it, it broke immediately, didn’t stretch. 太乾呀。I tried another recipe that had flour, cake flour, baking soda and vegetable oil, which worked only if I pulled the dough myself for 45 minutes. 好耐。 I’m dejected, but it could be my altitude. So far, making pulled noodles at above sea level doesn’t seem easy. 好慘, 好慘呀 🙁
You’re very persistent Danilo!
I don’t really understand how high altitude affects noodle dough. Maybe you can learn the method from this post, to use alkali water to make the dough more resilient: http://www.cooksscience.com/articles/feature/feeling-the-pull/
Ken is a noodle master. Maybe he has a perfect solution on making pulled noodles at above sea level.
Hi Maggie,
Thanks for the recipe. Is it possible to store the noodles before cooking? Can I pull them and then coat them in cornstarch or something and then put them in the fridge? What is the best way to store them so I can cook them in the future?
Hi Lucy, the best way to prepare ahead and cook later is to store the sliced noodle dough. After the dough is rested twice, you can cut them to small pieces and shape into balls, rub with a thin layer of vegetable oil (so they won’t stick together), then store in a airtight container in the fridge. The dough will hold for a day. If you plan to store longer, freeze the dough and thaw them in the fridge before using.
Before cooking, return the dough to room temperature. Roll out and let some more time before pulling.
Chinese restaurants usually use this method to prep the dough a day ahead.
Happy cooking and hope your noodles will turn out great 🙂
Thanks for this recipe! I am wondering what would happen if you were to change the initial resting time? Namely, how would resting it for less time change the resulting noodles? Can you explain the chemical process here?
I ask because I started making them at 7pm, but my eyes skipped over the two hour resting time and now I have to look forward to not eating dinner until 9:30pm! T_T
Hi Shanna, the resting time will allow the gluten to relax completely, so the dough becomes smoother and will be easier to pull. Yes you can shorten the initial resting time to 40 minutes, knead it the second time, and let the dough to rest again. The problem of short resting time will result in a very elastic dough that is difficult to pull. In this case, try to roll the dough out a bit thinner and cut to narrower noodles, it will be much easier to pull.
I hope the noodles come out well and you won’t be starving!
Hi Maggie,
Great recipe. I’ve made these a couple of times and have enjoyed them thoroughly. I was wondering if you’d be able to provide advice on how to gain more control over the tenderness and level of chew the noodles have. Basically, what different steps would I need to take to give the noodles more bite, or conversely, make them silkier. Add more salt? Knead for longer? Rest overnight? Thanks in advance.
Hi Paul, great question! To give the noodles a chewy texture, you can use less water and some salt. Although it might makes the dough a bit difficult to pull. In China street vendor adds alkaline to the dough (it is also the way Japanese restaurant makes ramen), so the dough becomes smooth and elastic, with a yellow color and easier to pull. For the alkaline method, I need to do a bit more experiment to figure out a recipe.
Meantime, you can refer to this post: https://omnivorescookbook.com/ding-ding-chao-mian It shows a different noodle in this recipe, but you can use this dough to make hand pulled noodles as well. The result will be a chewier noodle.
To make a silkier dough, use 1 part of all-purpose flour and 1 part pastry flour if you live in the US (the protein ratio of this blend will be similar to Chinese all-purpose flour). So the noodle will be tender by following this recipe.
Hi Maggie, can I premade and roll out the noodle sheets first and store them for later use? if it is possible, how do I store them ? Can i stack them together? WIll they stick in between the sheets?
Hi Nicholas, yes you can prepare the dough ahead. I found the easily way is to store the small round dough balls. You can grease them with vegetable oil and save them on a tray with plastic cover, so they don’t stick together. Store in the fridge, and return to room temperature before pulling. When you’re ready to cook, you can roll them out and pull the noodles directly. The noodles will be easy to stretch after a long resting time.
Hi Maggie,
Thanks for recipe. My first time making noodles … it worked out well. I left dough over night in the fridge. I’m now trying to see if I can freeze these raw noodles (sprinkled with flour) rather then dough.
Hi Evelyn, I haven’t tried freezing the noodles yet but I assume you can as long as you seal the bag well. Do let me know how the result turns out! I’m very curious and can’t wait to try it out soon 🙂
Maggie, i am really sorry to ask you about this, but i really need to know what is the alkaline water and how to make it ?
Because not so easy for me to found it on my place.
Please help
I adore hand-pulled noodles, but was always put off by watching all that twisting, pulling and table-banging. So glad I took the time to watch your video and learn this very simple method for pulling noodles. Perfect on the first try. Thank you!
I was an ex-pat in China from 2001 to 2005, and in Xian, they made them. It was quite the show, and I loved eating them. Maggie’s method was much less time consuming and closer to the method of noodle making of my Danish/ North German heritage.
Thanks so much for the easy recipe and helpful video! I made these last night and they came out great! I look forward to checking out your other recipes. 🙂
Forgot to rate the recipe.
I’m so glad to hear the recipe worked for you, Amy! Thanks for taking time and leaving a comment. Can’t wait to hear what you’ll cook the next 🙂
Hi.
I was an ex-pat in your country during the first half of the last decade, and I came to appreciate a lot of home-cooking like Lions Heads and variations of these noodles. The chefs of China have taken sweet corn and elevated it to whole new levels from sweet corn ice cream to sweet corn tomato soup. Although my office was based in Shanghai, I spent most of my first year in Anhui, my second year was spent operating from Zhejiang, WenZhou, and from there, I was traveling around the south half of the province in LiShui, Taizhou, Jinhua, and QuZhou. My third and fourth years had me working in Shaanxi, Beijing, Hubei, Hunan, and all over Guangdong.
In Zhejiang, they had bread-like cakes which they sold has street food, and they were cheap. In Wenzhou, the style tended to be the size of a dinner plate and about 1/2 inch thick while in Jinhua, they were very thin and about the size of a saucer. I am not sure what the ingredients of the dough were exactly, but I suspect that it was similar to your noodle recipe here. The dough would be a little stiffer of course, but it was still elastic. In Wenzhou, I watched the lady rolling out her dough and her husband chopping up fat and some green vegetable. She would then take a scoop of this mixture, put it in the center dough, fold the dough around it, and roll it out flat again, much as you do with your red bean /sticky rice cakes. In Jinhua, they pan-fried them as they were very thin, and I don’t recall them using any fat, but in Wenzhou, they had baked these in pots set on top of the charcoal heated kiln-like ovens. They had cost 5 yuan, and I ate these quite a bit.
Thank you for this great recipe! It is the easiest pulled-noodle recipes I have tried and so delicious!
Do you think this will work with egg noodles?
Hi Sophia, I’m glad to hear the recipe worked for you! I have not tried it with egg noodles yet but I imagine it will work. I’d love to test it out in my kitchen some time 🙂
Hi Maggie – Egg noodles worked!! It worked the way you pulled it, and it also worked when I hold the two ends on my two hands and bounce the noodle up and down, hitting the counter when it came down. I got 5-6 feet long noodles! Amazing! I like egg noodles because they do not get mushy in soups. Thanks again for your recipe and video, I am very thankful to you!
Hi Sophia, thanks so much for the update! What a great news. Now I might change my Sunday plan and make some noodles 😉
Hope you enjoy the rest of the weekend!
This recipe is fantastic! I first tried hand-pulled noodles after purchasing a Groupon a few years back. I was amazed by the process and how amazing fresh noodles taste. I just finished making my first batch of hand-pulled noodles from your recipe… I even messed up in the beginning by adding too much water initially. Nevertheless, the recipe was so accommodating. I was able to completely capture the taste I have been longing for since the 1st time I tried them. Thank you so much for sharing this recipe and being encouraging to say this is easy and you can do it too.. There are other recipes online that tell you it’s really hard to make hand-pulled noodles. I am grateful to have found your page. Thank you so much!!!!
I traveled to Lanzhou this past weekend with a group of hikers and we all fell in love with Lanzhou hand pulled noodles! So happy to have found this recipe and video. Thank you! Looking forward to checking out some of your other dishes
Hello! Thank you fir posting this recipe. I am very interested in achieving some level of hand pulled noodle mastery. This recipe came out very stiff and even after hours of rest the dough still had too much retraction. I kneaded by hand 15 minutes, and followed the rest of the instructions. Do you have a recipe that would allow me to twist and pull the noodles by hand like on you tube, where the chef makes many noodles simultaneously? I have been unable to find a suitable recipe that would allow me to try that technique. They seem to use oil, with a much softer dough. Thank you and all the best!
Helo, i love this noodle(la mian). For 4 years i have try to make hand pulled Noodles. But i dont have sucess.
Please help me about the secret or ability to make It! Whats amount of glúten os necessari in flour? Wheat flour?
Use sesame oil?
Use baking soda? Normal or baked?
Amount of Salt?
Please help!
Maggie, thank you for the hand pulled noodle recipe. My dough was very soft and easy to pull after resting for 4 hours. I think it was stickier than your dough and when I pulled it and cooked it the noodles were very tough and chewey, moreso than the hand pulled noodles I’ve had in restaurants. I kept cooking the noodles for shorter amounts of time (from 2 minutes down to about 30 seconds) and they were all tough. Do you know why the dough would be very soft before cooking and then the noodles too tough after?
I watched a chef in Shanghai make noodles, the fine round ones. He stretched the ball of dough to arms length, folded over, stretched between his thumbs, repeat, repeat., etc. They turned out to be about 3mm diameter. That’s what I’m going for.
Tnx Maggie
Hi! I made a half batch of dough today and rolled, pulled, and cooked just a quarter of the dough tonight. I cut it pretty thin and will try wider next time, but it was a good texture. I’d just tried a recipe with baked baking soda in it, 1tsp to 220g flour and 2eggs, and the bitter bicarb taste was overpowering. Couldn’t eat it.
I did kind of mix up the flours and used 145g all purpose and 65g bread flour, just to see. I was pleased with the stretchiness of the dough so I think it was a success. I noticed Daniel posted he used White Lily flour. That is mainly used in the US south for light biscuits and cakes, and is made from a soft winter wheat that is not going to be great for kneaded breads or noodles. WL does make a bread flour but I never see it in stores. Not sure whether he had the self-raising or traditional.
When I was working in WenZhou and around ZheJiang in general, there were always little food stalls run mostly by Hui who had the shaved noodles, but they were never as long as shown in a You Tube video for Dao Xiao Mian. They were usually about an inch or two long, they were boiled for a little while, but then they were tossed in wok, where they were cooked some more with a light sauce, chopped lamb or beef, and chili flakes that had a pleasant spice which made the palate dance. I ate a lot from those, but I also would sometimes buy a sort of bread made in little stalls that varied from city to city. In WenZhou, the cooks at the hotel I was staying at would purposefully cook orders for people who were seated and ordered long after me, so it was either go to bed hungry or try to find food outside. I simply could not stomach KFC which the waitress in tears said was still open when she saw what the kitchen was doing to me. That’s how I came across a little place with a bunch of round ovens heated by big charcoal pellets. All this lady and her husband did was make these breads which the dough was rolled out, chopped fat and green vegetable was put in, and it was folded over, rolled out again, and baked. They were about a half inch thick and the size of dinner plates. I think it must have brought some joy to these people when this Meiguoren was visiting their stall more than once a week, because they always greeted me with a smile and asked me to come sit with them for a little while. It brought me much joy too. In Jinhua, there was a variation of this bread, but it was thinner and the size of a saucer. There was no fat in it.
Using plain flour to make the dough is a bit problematic, it tends to be brittle. One solution is to add white vinegar to the dough, which makes the product much more “pulleable”. I have seen real artists in China making any thickness or shape of noodle. In Chengde and in Xian, youngsters dancing a vail dance while pulling noodle, flipping the long strands over theirs head, behind their back, jumping over them in the most graceful manner. All I could think is: National ballet, eat your heart out.